Tuesday, November 12, 2013

Winged Eyeliner- YouTube Video

Hi dolls!
I finally uploaded my winged eyeliner tutorial on my YouTube channel. I'm using a brown gel liner from MAC, because I was obsessed with it during the time I recorded this video. :P I also felt that it was different from all the eyeliner videos on YouTube. 
For those who are wondering I like to use Maybelline's gel liner when doing my winged eyeliner in black. Also, I have a habit of getting bored of brushes easily. So, when I'm tired of using MAC's 209 brush (featured in this video) i'll use either Sonia Kashuks angle eyeliner brush or MAC's 266 brush. 
If you have any questions feel free to ask me on the comment box below (or you can email me). 
Love you guys! Muah!

Don't forget to subscribe to my channel! 


Tuesday, July 23, 2013

New YouTube Channel!

Hi loves! So, I'm excited (and nervous) to announce that I finally made a YouTube channel!!
I am beyond scared, but most of you motivated, convinced, and inspired me to just go on and do it! I hope that you all love and it and find my videos helpful. If there are ever any request as to anything you want to see me do or review please don't be afraid to ask. I'm here to help! :)
Thank you all so much for your support!
YouTube Channel: MakeupByMaggieV


Please subscribe! <3


Tuesday, June 11, 2013

Make it glow!

Hi beautiful dolls!
I wanted to show you some of my favorite highlighters/luminizers to use especially right now during the summer. These products reflect ever so pretty in the sun as well as pictures. Not only does it reflect beautifully, but it also helps make your certain features stand out (depending where you apply it). I am seriously so addicted to highliting that I have incorporated it to my daily makeup routine!

Where do you apply it?

  -Cheekbones
  -Cupids bow
-Brow bone
           -Chin (very lightly)
                  -Forehead (very lightly)
            -Inner Corner of eye
          -Bridge of the nose

Liquid:

-Sonia Kashuk Super Sheer Shimmering Highlighter in 4
Bronze type of glow, and very shimmery!

-ELF Shimmering Facial Whip in Lilac Petal
Frosty pinkish glow.

-Benefit High Beam
Frosty pinkish glow.

-MAC Prep + Prime Highliter in Radiant Rose
Pinkish glow without the shimmer.

Powder:
-Lorac Perfectly Lit in Spotlight
Oil-free. Shimmery yellow glow.

-NARS Albatross
Shimmery yellow glow.

-MAC Mineralize Skinfinish in Soft & Gentle
Pink shimmery glow.

(Left to right)
MAC Soft & Gentle, Lorac Spotlight, NARS Albatross, Sonia Kashuk Shimmering Highlighter, Benefit High Beam, ELF Facial Whip, MAC Prep + Prime Radiant Rose.


Thursday, May 2, 2013

MOTD - Modern Pin-Up

Hi loves,
Here is a modern pin-up makeup look I did. It's super easy, simple, and will look flattering on EVERYONE! I am seriously in love with the lip color that I'm wearing! I feel it really brought this whole look together. Hope you guys like!


Favorite Products Used: 


MAC Russian Red Lipstick         MAC Mineralize Skinfinish in Soft & Gentle


Products Used:
Face:
L'oreal Lumi Foundation
MAC Mineralized Skin Finish Soft & Gentle
Laura Mercier Translucent Pressed Powder
MAC Blushbaby Blush
NARS Laguna Bronzer
MAC Prep + Prime in Radiant Rose

Eyes:
Maybelline's Eye Studio Gel Liner
L'Oreal Voluminous Mascara
MAC Soft Brown
MAC Vanilla
MAC Nylon
MAC Brown Script
MAC Cork (brows)
BrowZing (brows)

Lips:
MAC Current Lipliner
MAC Russian Red


Wednesday, April 3, 2013

March Favorites 2013


Hi guys!!
I wanted to do a post on my favorite and most used products for the month of March. Some of these products were already in my kit and I completely forgot how amazing they were! I did some swatches on my arm to give you guys a better visual. Hopefully you guys try them out and like!


L'Oreal True Match Lumi Foundation - $9-$11 
This foundation has been my go-to foundation this month! If you're looking for that dewey/luminous look you have to try this one out! It provides you with SPF 20, antioxidants (vitamin E & C), and hydration. Doesn't that sound wonderful? Now, here's the downside: if you have an oily T-Zone like me it can get a little greasy by the middle or the end of the day. My tip is to either apply it lightly or powder well and throughout the day. The coverage is light-to medium so if you're looking for heavy coverage this might not be the best foundation for you. All in all, I love the finish it gave me and the way it felt light on my face.

Giorgio Armani Silk UV Foundation - $60
Yes- $60 freaking dollars! When I bought this there was no price tag in sight, and I was so determined to get this product (due to popular demand) so I completely forgot to ask! If you are willing to spend this amount of money on a foundation then do so on THIS particular foundation! It is simply amazing! The shade that I got is now too light for me so instead I wear it as my highlight. It is medium coverage and is satin-matte so it works great for normal to oily skin. It's water-based and also has SPF 20. It feels really light on the skin which I am very impressed with.

MAC Mineralize SkinFinish in Soft & Gentle - $30
First of all, I was completely in love with NARS Albatross and thought it was irreplaceable. Then one of my makeup friends showed me this product in person and It completely took my breath away! This highlight is soooo beautiful and it photographs so well! I use it to highlight my cheek bones, cupids bow, chin and bridge of my nose. Spray your brush with MAC's Fix+ before dipping to give it a frosty and even more gorgeous look. This product easily replaced NARS Albatross!

Boots Extracts Olive Wonderbalm - $9
I use this balm on my lips, but it can also be used on your elbows and knees. It helps nourish and soften dry skin and it smells wonderful! To me it smells like grapes. The texture is sort of like vaseline, but not as greasy. I think it works better than regular chapstick and it stays on a little longer, too. I bought this at Target and for the price I think it's worth it if you have very dry and cracked lips.

MAC Lipstick in Please Me - $14
This lipstick is my favorite lipstick right now! It's a light pink matte color, and it looks gorgeous under a pink lip gloss. I found it wearable with dramatic eye looks, blue eye shadows, and on neutral looks. I've been wearing it way to many times since I rediscovered it in my kit!

Maybelline Eyestudio Gel Liner in Blackest Black - $7
This gel liner is the blackest gel liner i've ever tried! For me it beats MAC's Blacktrack gel liner all the way! Impressive!!

NYX Soft Matte Lip Cream in Addis Ababa & Antwerp - $6
I just discovered these lip creams by NYX and I can't put them down! They feel so smooth and the colors are so pretty! It's not as high pigmented, but they're still gorgeous.

L'Oreal Magic Lumi Concealer/Corrector - $13
This product is so easy to use since it comes in a twisty pen so it makes it easy to apply with its brush. I carry it with me everywhere! I also use this to highlight and conceal under eyes. It doesn't feel cakey and it gives you a slight dewy finish! Awesome concealer!

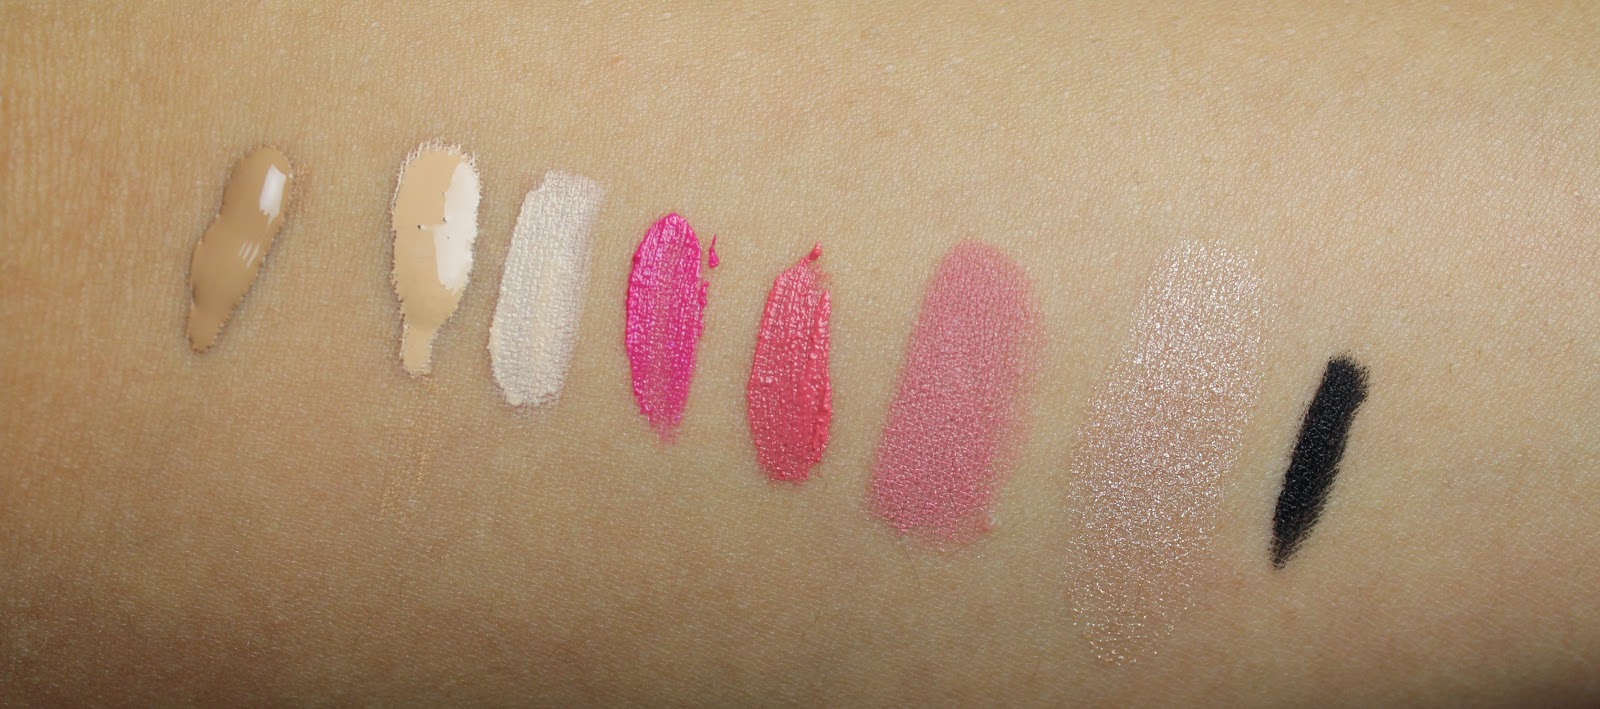
(Swatches from left to right)
L'Oreal Lumi Foundation, Giorgio Armani Silk Foundation, L'Oreal Magic Lumi Concealer, NYX Addis Ababa, NYX Antwerp, MAC Please Me, MAC Soft & Gentle, Maybeline Gel Liner (I didn't include the Wonderbalm since its just clear & shiny).

If you try them out please let me know what you think!
Don't forget to follow my blog! Muah!
xo

Wednesday, March 6, 2013

MOTD - Pink Lips & Winged Eye

Hi loves!
About a couple weeks ago I posted a picture on my Instagram (maggie_valtierra), and i've been meaning to post it on here for my Makeup of the Day (MOTD) section that i'm starting in my blog! What I love about this look is that it doesn't look like too much and it's totally wearable. The baby pink lips makes the overall look seem soft, and even simple. Let me know what you guys think, and if you would love to see more MOTD's.
Muah!


Products Used:
Face:
Armani Silk Luminous Foundation
Laura Mercier Setting Powder
NARS Blush in Orgasm
NARS Bronzer in Laguna
NARS Highliter Blush in Albatross

Eyes:
NYX Jumbo Pencil in Milk
Sephora Cream Liner
Urban Decay Naked Palette (Buck, Sin, Virgin)
MAC Eyeshadow Nylon
L'Oreal Voluminous Mascara

Brows:
Benefit's BrowZing in Medium
MAC's Eyeshadow in Cork

Lips:
Covergirl - Enchantress
Don't forget to follow me on Instagram!

Monday, February 25, 2013

"YOLO" Tattoo - Music Video Makeup

Hi guys! Hope you are all doing fabulous!  

A few weeks ago I posted pictures from the music video shoot where I got to do makeup for both of the main actors/band members from Bad Chemistry. I realized that I didn't include any close-ups of the tattoo itself that I drew on the "party guy". I wish I would have taken more pictures, but at least I got these three. So, here you go! Let me know what you guys think! 


I also wanted to point out that you can purchase "Mayday!" by Bad Chemistry and 50% of their proceeds will go to the LOVE HOPE STRENGTH Foundation! Aren't they just awesome!?

If you haven't checked out their music video make sure to check it out. It's both hilarious and clever, AND I make a guest appearance for a whole 5 seconds!
Go Maggie!

Click here for more pictures from the shoot on my other post.

Click here for "Mayday!" by Bad Chemistry (music video).

Click here to buy "Mayday!" and donate money to LOVE HOPE STRENGTH.


Thursday, February 21, 2013

Skin Imperfection: Acne

Unfortunately, we have those days when a little "friend" spontaneously decides to come around and stay for a couple of days on our face! Acne... oh how we hate you.

Well, the good news is that it's not the end of the world! The best thing to do is let it breathe, and wear NO makeup whatsoever on it. The thing is..."aint nobody got time fo that!" Sometimes, we may have a date, photo shoot, prom, meeting, and whatever else our busy little lives may bring us, and a pimple is the least thing we need!

So, what do you do???
Cover it up with makeup! :D

First:
You're going to need to use a little method called "color-correction". Chances are you're pimple or blemish is red, and that's the color you first have to counteract. If you look at a color-wheel Green and Red are opposite from each other. So what does that mean? This means that GREEN is the color you will use in order to neutralize the redness. Here's the trick, gently dab the green creamy corrector ONLY where you see red. Here are some green correctors I recommend:

Makeup Forever Concealer Palette              Maybelline Coverstick 
Second:
You will need to cover that green with a creamy concealer. Make sure to blend out the edges. It's easier to do this with your fingers so that the warmth of your fingers makes it easier to blend out the concealer.
Bobbi Brown Concealer Kit (it comes w/a setting powder)
Third:
You will be using a full-coverage foundation to cover up the whole thing up as well as your face if you'd like. Also make sure that you are gentle in that area so that you don't rub the concealer and corrector off. It's best to use your finger.
Neutrogena Skin Clearing Oil-Free Makeup         Luara Mercier Oil-Free Founation
Fourth:
Use a setting powder to set that area so that it lasts longer. Try using gentle pressing motions so that it sets better. Here are some powders you can try:
ELF High Definition Powder          NARS Light Reflecting Loose Setting Powder

Thanks for reading guys!
Don't forget to leave me a message below for any questions or comments!
xo

Wednesday, February 20, 2013

Skin Imperfection: Oily Skin


Oily skin has to be one of the most annoying problems (besides acne) that some of us have to go through. The good news is that there is a way for us to control it. We might not be able to completely get rid of it, but we can definitively control it.

WHY DOES IT HAPPEN!?
*Hormones
*Over-Active Glands
*Genetics
*Medical Conditions
*Sun Damage

If you're like me and love to wear makeup everyday here are a couple of things you can add to your morning routine:

Cleanse & Tone: 
Cleanse your skin using products meant for oily skin. These products will be water-based or oil-free, and will not contain salicylic acid. DON’T USE SOAPS! These products wont like your face, and they will either dry you out or create even more oil! Not cute! Also, make sure you use toners, which will help absorb some of that oil and get rid of even more dirt left on your face.  You can also try Witch Hazel to get rid of excess oil and further cleanse.

Moisturizer:
This might seem weird since you’d think that oily skin would help keep your skin moisturized, but it doesn’t necessarily work this way. You still need a moisturizer to hydrate your skin. Using a mattyfying lotion is your best bet to help hydrate your face while absorbing oil. You can also use moisturizers that say “Non-Comedogenic” or “Oil-Free”.

Primer: 
If you’re going to wear foundation, and you have an oily T-Zone primer will help! It will definitely help keep back some of that shine. Two of my favorites that I use are MAC’s Skin Refined Zone Treatment and Smashbox Oil-Free Photo Finish Primer.
Oil-Free or Water-Based Foundation:
If you like to wear foundation make sure you use one that says it’s "Water-Based" or "Oil-Free". These foundations can help absorb oil, control shine, and resist sweat. As i've mentioned in other blogs my favorite mattifying foundation is NARS Sheer Matte Foundation.

Mattifying Powder:  
These powders are great for setting your makeup while absorbing and controlling shine. This step is a must! You can still use a powder even if you don’t wear makeup. Just don’t over-powder! My all time favorite is Urban Decay's De-Slick Mattifying Powder!
Blotting Paper:
These little things come in handy! They help absorb shine, and are great if you’re on the go. Just dab it all over your face, and throw it away afterwards. (I personally stare at the paper with amusements before throwing it away, but that’s just me…)


Wednesday, February 13, 2013

Skin Imperfection- Dark Spots

Dark spots are caused by various reasons: aging, hyperpigmentation, acne scars, under-eye circles, etc. These reasons can be out of our control, and getting rid of them may be very tricky and sometimes impossible. However, hiding them with makeup is your best bet. In order to hide these imperfection you will need foundation, pink and/or peachy colored correctors. 

Pink Correctors:
Work best for concealing dark circles. Apply using your ring finger or a flat synthetic brush. Don't forget to set it with a setting powder.

Peach Correctors:
Work best for concealing dark spots (i.e. acne scars, aging spots). Apply only on problem areas with your ring finger before applying foundation. Don't forget to set it with a setting powder.


Color Correcting Primers:
These primers usually already have a pink or peachy tint to them. Not only do they help hide discoloration, but they serve the purpose of a regular face primer as well. Just make sure you use these primers sparingly, and concentrating only on problem areas. Here are two tinted correcting primers from Smashbox:
Foundation:

Using a full-coverage foundation will definitely help conceal dark spots. You can also try a foundation color corrector that already has a peachy/apricot tint. I found one online by Koh Gen Do called Foundation Color Corrector.  You simply mix this with your foundation as needed. 

Serum:

Dark spot correcting serums are formulated with ingredients that will help fade away dark spots. Of course it takes time, and it all depends on your skin and the brand you buy. Just apply a small amount to the spots themselves right before your makeup and at night after cleansing your face. These are some popular dark spot correctors that I found by Clinique, Yes to Grapefruit, and Garnier.


If you guys decide to try any of these correctors or foundations on your dark spots or under eye circles just remember to use these products sparingly. Most of the time these products are very creamy and highly pigmented so a dot-sized amount should be enough. Don't forget to set with powder either. 

Let me know if you guys have any questions or comments on the comment box below! 
Muah!
xo